 修图师
修图师【很早之前写的一篇文章了,不过放到现在应该还是有价值的吧。】
这一期我就先放下手里的压感笔来一发原创内容吧,就来聊聊现在的高端摄影后期中常见的相片处理技法吧,这期主要讲解片子的基本修饰方法,可以理解为皮肤处理以及光影处理,不涉及到调色液化之类的。
雨总我前几年一直在北漂,就职于环铁一线附近的某家业内知名文化传媒公司,从摄影助理干到了后期修图师,因为不是科班出身,也没有相关的学习经历所以走了很多弯路,从业到现在虽然技术方面不是很厉害,但多少也了解到了很多知识,这里就跟喜欢摄影后期的小伙伴们一起来探讨探讨吧。
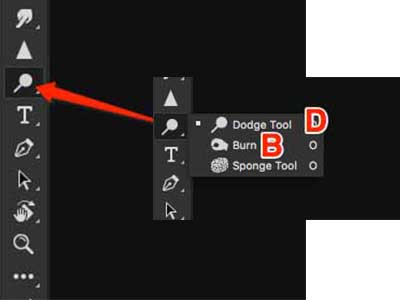
目前无论是商业修图还是高端一点的婚纱和写真后期修图中,所用的修图基本法法其实都大同小异,都是脱胎于DB修图理念,而所谓的DB修图也就是photoshop中的减淡与加深工具【dodge&burn】 的英文单词简写。
标注:加深减淡修饰是很强大的修饰方法,其主要工作目的是改变光影,并不是为了磨皮而生的。
随着DB修图技法在国内的发展,双曲线修图、中性灰修图、柔光图层、明度图层等等修图手法相应而生,但万变不离其宗,这些方法都属于减淡加深范畴内,下面我就将几种修图手法简单介绍一下。
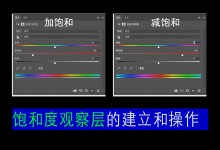
要想用减淡加深方法来处理图片,无论是双曲线还是中性灰以及其他类似的技法,不熟练的修图师们最好创建一组观察图层,也就是所谓的观察器。
创建观察器的目的便是将片子转为黑白,在这一步其实我们可以选择多种方法比如(新建黑白图层、色相饱和度图层、颜色模式的黑色图层等),当片子中只有黑白灰,我们就能看到画面中那些不和谐的或亮或暗的区域,也就是我们需要处理的关键点。
虽然修饰点出现了,但往往不够明显,这时候我们就需要创建第二个图层了,一般情况下我们会选择曲线图层,加强对比,这时候你会发现原本不太明显的斑斑点点一一出现了,画面着实令人惊叹。
两个图层都已创建好后,我们将其放进一个组里面,这样在需要的时候我们就可以查看,不需要时候直接隐藏。

这里需要补充一点,用曲线拉对比的时候不要太过用力,以免修饰过度,下面就详细讲解一下这几种修图手法吧!
第一种,也是我个人常用的一种处理皮肤的技法——双曲线修图
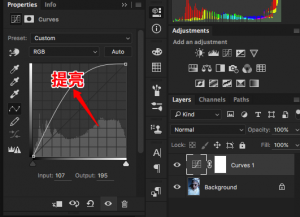

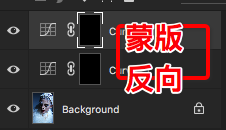
新建两个曲线图层,一个提亮一个压暗,然后将白色蒙版反向变为黑色,用白色画笔在蒙版上擦拭你要修改的位置。
优点:减淡加深图层互不干扰,修改简单,皮肤整体色彩不易发生变化。
缺点:因为减淡加深都是单一图层所以需要单独点选图层,操作比较繁琐。
第二种,比起双曲线来说操作更为简单——中性灰修图

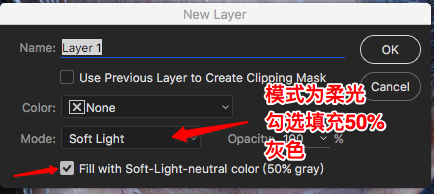

创建好中灰层后,利用画笔在灰层上进行修饰,并且利用快捷键X切换黑白画笔
优点:所有操作都在单一图层上完成,操作方便快捷,可以单选本图层观察修饰痕迹。
缺点:容易导致局部皮肤颜色发生改变,需要后期补色,同时无法直接修改本层。
第三种,柔光图层以及明度图层
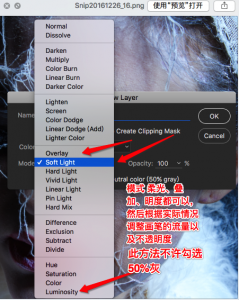
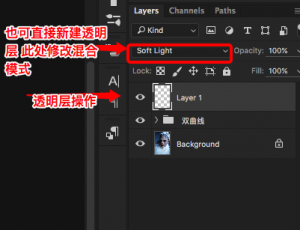
优点:所有操作都在单一图层上完成,操作便捷,修改方便可直接在本图上操作。
缺点:同样容易发生局部肤色变化过大,需要后期补色,无法查看修饰痕迹。
简单的介绍了这几种人像修图的基本法,相信现在很多修图师都已经熟练的掌握了这些修图手法,而且现在的AI 技术也已经日新月异了,很多除去 ps 的第三方软件都已经能够做到在一键修图的同时只需要简单调整一些参数就能获得很好的修图效果。
这些 AI 修图软件能够很好的解放我们修图师的双手和双眼,大大的提高我们修图的效率。不过这些所谓的智能修图软件也只能算是半智能,毕竟一张片子的美丑代码目前是没什么观念的,还需要我们修图师亲自掌控。这也表明拥有审美能力,是一个修图师是多么重要的技艺。
AI 修图不能不用,但也不能全用,基础的重复的劳累的可以交给它,但是在一锤定音的关键步骤上还是需要靠我们自身才是正道。


